Wednesday 23 April 2008

M.I.A

Pin It Now!

I'll be missing in action for the next week or so. Tomorrow I'm off to Glasgow for the Glasgow International Artist Bookfair, so if you should be around why don't you pop in! There'll be loads of wonderful stalls selling limited edition hand-made artist books, prints and cards and so on.

I won't get back till late on Sunday and then on Wednesday I'm off to visit my family in Germany to celebrate my nephew's First Communion as well as the combined birthday party of one of my best friends and her hubby. So, as you can see, I'll hardly have a chance to get into my kitchen, but if I do cook anything or get hold of any wonderful recipes or goodies along the way, I'll make sure to let you all know about it when I get back.

Ta ta for now!

Photobucket


Monday 21 April 2008

Could you live without Pasta?

Pin It Now!

I think I'd struggle. Of course really fresh homemade pasta is the best, I don't have a pasta machine though so most of the time I'll buy fresh pasta from the supermarket, but I wouldn't even want to be without just the normal dried stuff. When it comes to pasta, I'm really not a food snob and sometimes, when I'm on my own I'll happily just tuck into a plate of spaghetti with tomato ketchup. There you have it, it's out, my confession of a dark food secret!

You're probably turning your head away, completely sickened, vowing to never come read my blog again now, but doesn't everyone have one of those dishes? Please, say yes! Make me feel normal!

Anyways, if you are still with me and haven't closed the browser window in disgust yet, I'll leave you with one of my favourite recipe for tomato based pasta sauce. Well, I say recipe, because this time I actually measured what went in, but I usually just throw it together and it turns out slightly different but really good every time. Oh, and yes, it does contain a little bit of Heinz Tomato Ketchup, but just a small amount that adds a nice sweetness to balance the acidity of the tinned tomatoes, and I promise nobody will be able to detect it in the finished sauce.

Photobucket

Sylvie's Pasta Sauce with Sausage and Peppers
(serves 4)

6 bangers, casings removed (British sausages, I like to use Cumberland or Lincolnshire, but whatever you like)
1 onion
2tbsp tomato puree
3tbsp sundried tomato puree
2 cloves garlic, crushed
1 can chopped tomatoes with herbs
1 ½ tsp Italian Seasoning
2tsp dried oregano
1 ½ tsp vegetable stock powder
1 ½ tsp balsamic vinegar
2 tsp sugar
2tsp sambal oelek (optional)
5tbsp Heinz tomato ketchup
1 ½ peppers, chopped
8 chestnut mushrooms, sliced
salt and pepper, to taste


Heat a little olive oil in a large non-stick frying pan. Add the onion and the sausage meat and fry on a medium to high heat until the sausage is starting to brown. You need to break the sausages up really well with a wooden spoon while they’re frying.

Add both kinds of tomato puree and the garlic. Stir to coat all the meat and onions and fry for a further minute or so.

Add the tomatoes and fill the empty can with water, adding that as well.

Now add all the rest of the ingredients and stir well.

Bring to a boil and then reduce the heat to a simmer. Simmer until the sauce has thickened, about 30-45 minutes, stirring occasionally.

Taste and season with salt and pepper as necessary.

Photobucket


Can you see the sunshine in the pictures? Finally, it actually feels a bit like spring today, not just is the sun out, but it's actually the first day where it feels quite mild. When I went out for a run in my long-sleeved winter gear, I quickly started wishing I'd put on short sleeves. Could it be that spring is finally here, or have I jinxed it all now by writing about it?

Baking Bread

Pin It Now!

I've grown up with my mother regularly baking bread at home. She mainly bakes plain white loaves, which fill the house with an amazing smell and taste wonderful as they come out of the oven. I would happily eat a few slices just as they are, not even needing butter or anything else to top them. You can ask my friend C., she'll agree. We used to joke that she could smell my mother's bread at the other end of the village, as you could be sure she'd be around on bread baking days (and no there was no kind of schedule or regularity for her to plan her visits to).

Even though I don't think I ever baked bread with my mum, I obviously was around a lot when she did and maybe that's why I never had a fear of yeast and happily bake anything with it in. I know a lot of people are put off by baking with yeast though (honestly, don't be, just give it a try), but that doesn't mean you can't have fresh bread made in your own kitchen. If you don't like baking with yeast or don't want to or can't hang around waiting for proofing and dough rising, try baking a soda bread. There's no yeast in sight and it still makes your house smell wonderful and you get that satisfaction that comes from taking a beautiful loaf of fresh bread from the oven.

Photobucket

Soda Bread (makes two loaves)

3 cups plain white flour
3 cups wholemeal flour (You can use just just white flour if you prefer. If you do 2 1/2cups of buttermilk should be enough.)
2 tsp baking soda
2 tsp baking powder
3 tbsp cornflour (cornstarch)
2 tsp sugar
1 tsp salt
2 1/2 - 2 3/4 cups buttermilk

Preheat your oven to 190C/Gas 5.

Mix all the dry ingredients in a large mixing bowl.

Add the buttermilk, starting with 2 1/2 cups and mix into the dry ingredients. If you are using both, brown and white flour, you might need to add up to 1/4 cup more to bind the flour.

The mix will be a bit lumpy and not too sticky.

Turn it out onto a floured surface and kneed it for a minute or so until well combined, it stops being lumpy.

Divide into two and form round loaves with a flattened top.

Place on a non stick baking tray.

With a sharp knife slash a cross into the top and rest for ten minutes.

Bake for 40-45 minutes, until golden brown. If the loaves are done they will sound hollow when tapped on the bottom.

Any homemade loaf, yeast bread or not, is best eaten fresh on the day you bake it. If you want to store it though, I find the best way is to cut it into slices as soon as it is cool, wrap it in freezer bags and freeze it straight away. That way you can take the required portions out of the freezer as and when you need it. The slices defrost in less than half an hour and taste pretty much as fresh.

Sunday 20 April 2008

Not Quite Sunday Roast

Pin It Now!

The plan was to have traditional Sunday Roast with all the trimmings today, but as I had some braising steak in the fridge that really needed using up, the plan was quickly changed. Instead I made a Spicy Beef Stew and baked some Soda Bread (which I'll post later) to go with it.

Since we've had more April showers this year as I can count and spring is still keeping us waiting here in the UK, the stew seemed to just hit the right spot. Adding the chili and the sweetcorn, obviously makes it quite different to the usual beef stew and gives it a nice kick.

Photobucket

Spicy Beef Stew (serves 4)

1-1 1/2 lbs braising steak, cut into cubes
1tbsp flour
1/2 tbsp paprika
1/2 tsp chili powder
1tsp salt
2 tbsp olive oil
1 garlic clove, crushed
1 onion, diced
1 can chopped tomatoes
1/2 tbsp chili powder
1 bay leaf
300ml beef stock
1/4 teaspoon dried red pepper flakes
1/2 tbsp butter butter
1/2 tsp sugar
2 carrots, peeled and sliced thickly
3 potatoes, cut bite-sized (you can leave the skin on)
1 small can sweetcorn, drained

Mix the flour, paprika, chili powder and salt in a large bowl.

Add meat and toss until it is well coated.

Heat the oil in a heavy based casserole pot (with a lid) and fry the meat until sealed on all sides and brown.

Add the garlic, onion, chopped tomatoes, chili powder, bay leaf, beef stock, chili flakes, butter and sugar. Mix well, bring to the boil, cover and reduce heat. Simmer for one hour, stirring occasionally.

Add the carrots and potatoes, cover and simmer for another 25-30 minutes or until tender. If you haven't got enough liquid add a bit more beef stock or just water.

Add the sweetcorn and heat through.

Don't forget to remove the bay leaf before serving.

If you like your stew thicker, mix 1tbsp of cornflour with 1tbsp of water and add to the stew whilst stirring. Simmer for another few minutes until it begins to thicken.

Photobucket


Saturday 19 April 2008

A Breakfast Treat

Pin It Now!

During the week breakfast is usually a very non-eventful meal in our house. Sometimes it doesn't happen at all. In any case it's usually nothing much more exciting than some cereal, a slice of toast with cream cheese and honey or porridge.

At the weekend it's a different story though, we take our time and we usually don't have it until at least mid morning, so it often replaces lunch. Most times we have a continental style breakfast with warm bread rolls, boiled eggs and a selection of sliced meats, cheese, jam and honey (not all on the same bread roll of course), plus fresh juice and plenty of coffee. Every now and then we feel like something different and therefore special though, and we might have a Full English or Pancakes with Maple Syrup and fruit.


Photobucket

When I saw that The Passionate Cook was hosting this month's 'Waiter! There is something in my ....' blog event and that the theme is breakfast, I thought I could join in. As our usual weekend breakfast doesn't involve any recipe (apart from ones for homemade jams, but I'll safe those for a different post) I thought we'd have one of those 'weekend specials' and made Scrambled Eggs and Smoked Salmon on a fresh bagel. It's one of those breakfast dishes that I'll happily eat for a quick dinner.

Bagels with Scrambled Eggs and Smoked Salmon
(serves two)

5 free range eggs
one packet Smoked Salmon, cut into strips
2 bagels
cream cheese
salt, to taste
pepper, to taste

Crack the eggs into a bowl and season with salt and pepper. Whisk with a fork until the yolks and egg whites have completely blended.

Heat a knob of butter in a non stick frying pan.

Pour in the eggs and top with the salmon strips.

After about half a minute start to scramble the eggs with a wooden spoon. Continue to stir and fry for a few minutes, until cooked but still a little moist. (You don't want to cook them until completely dry as they will continue to cook a little once on the plate/bagel.)

Divide the eggs between two bagels, which you have liberally spread with cream cheese (or butter if you prefer) and serve immediately.


Wednesday 16 April 2008

Passing it on

Pin It Now!

Okay, I've had some time to think about who to pass the You Keep Me Blogging Award on to, that did not make the decision any easier, but at least it meant I got to make a little logo thingy to pass on along with it, in case you want to keep it displayed on your site.

I had a really hard time as there are many of you who encourage me with your lovely comments all the time, some of you I already knew before I started this blog and some I have 'met' since. In order to narrow it down at least a little, I thought I'd like to pass it on to one of you who I hadn't known before I started blogging.

Firstly, I do want to use this opportunity though to say a special thanks to Nic of Cherrapeno, Marie of A Year from Oak Cottage and Julie of Tulip's Kitchen, for getting me into this in the first place and for your continued support and encouragement.

Now to passing on the award though, I have chosen Rosie of Rosie bakes a 'Peace' of Cake, a fellow UK food blogger, whose blog is great and I really enjoy reading. I've chosen Rosie, because even though she didn't know me at all, she started leaving lovely comments on all the posts and continues to do so. Thank you Rosie, for finding me in the first place and for helping to keep me going and a big THANK YOU to everyone else who takes the time to leave comments as well. I love to hear from you, so if you're a lurker, come on, don't be shy!

Rosie, this one's for you.....

Photobucket

Tuesday 15 April 2008

Houmous or Hummus or .....

Pin It Now!

...even humous, hommos, hommus, hummos, hummous or humus.

Well, who knows? I'm sure some of you do, but I usually go with one of the two at the top.

I'd never heard of it until about six years ago (is it really that long ago since I was a postgrad student) it seemed to become really popular all of a sudden and appeared just about on every menu and on the shelves of all the shops. Or, did I just not notice it before?

I have to admit though that the first time I tried it I didn't like it at all, which seemed to become a problem as the stuff was everywhere and everyone was eating it, so it was constantly offered to me. My Eureka moment came when my friend brought a huge bowl full of the stuff to a BBQ at my house. I gave it another chance and have never looked back.

Of course my friend didn't have a recipe though, like with so many good things that you make a lot all she could say was add a little of this and add a little of that. Not very helpful at all. That's when my quest for a great Houmous recipe started. I've tried many different ones over the years and this is the one that I have settled with (for now...I'm open to temptation) because it's pretty close to perfection in my opinion. Plus, a huge bonus in my eyes is, that it uses no olive oil (I can hear some of you cry out in despair: How can it be Houmous if there is no olive oil in it?! Trust me, if only this once!), so it must have less calories and be even better for you. Right? Well, I don't care really, I just eat it!

Photobucket

The Best Houmous or Hummus or.....

1 can chickpeas
4 garlic cloves, peeled and crushed
3 tbsp fresh lemon juice
3 tbsp tahini
1 tsp cumin

Drain the chickpeas, but save the liquid.

Add chickpeas, garlic, lemon juice, and tahini to the food processor or place them in a large bowl if you're using a stick blender.

Blend until you have a coarse but even consistency. You might need to srcape the sides down.

Add some of the reserved chickpea liquid until you get your preferred consistency. I'd start off with 3 tablespoons and add more if you like.


Monday 14 April 2008

A thank you

Pin It Now!

One of the steadily growing number of blogs I subscribe to in my Google Reader is It's Melissa's Kitchen. When I first came across it I never realised that like me Melissa is quite new to blogging, I just really liked her blog and as with all the blogs I like, I started to leave little comments. Now, Melissa has just posted her 50th post (coincidentally so did I) and she wanted to make it special, so she started a new award, which she called the 'You Keep me Blogging Award' and best of all she gave it to me. I couldn't believe it.

So, Melissa, here is a big THANK YOU, but now comes the hard part, I don't want to keep it to myself, so I'm gonna have to think of somebody to pass it on to. Somebody, who through their encouragement and comments keeps me switching the computer on, logging in and rambling about what's happening in my kitchen. I'll think about it for a couple of days, as there are quite a few people who'd deserve it and while I do that, I'll try and come up with a little logo thingy to pass on as well.

Photobucket

Sunday 13 April 2008

It's lamb again

Pin It Now!

Photobucket

It's just gone five in the afternoon and I'm starting to feel human again after having a two hour nap on the sofa. We had two birthday parties to go to last night and I'm afraid to say that I had one or maybe even two G&Ts too many. Why do I never learn that what seems like a good idea at the time, often doesn't seem quite so good in the morning?

Oh well, maybe I'll remember next time.....or maybe not....

This week has been a poor week as far as cooking goes. There has been a not quite disastrous, but certainly not successful, attempt of making pizza crust from refrigerated bread roll dough (What do they put in it that makes it spring back every time you try to roll it out?) and there has been a night of tinned mackerel in tomato sauce on toast. So, you can see definitely nothing blog-worthy, that's why I'll leave you with one I did earlier...

This dish certainly puts me in the mood for summer. It conjures up thoughts of evenings spend sitting out in t-shirts with a beer or two (not that beer is a good thought for me right this minute) and just talking and laughing.

If I remember it right the recipe came from something like the Guardian Weekend or the Observer Food Monthly magazine. I found it years ago when I was working in a call centre, killing time flicking through things in between calls, I remember copying it down as the magazine wasn't mine but I really wanted to give the recipe a try. If you can't buy harissa, it's easy to make or you can use sambal oelek instead, it also works great.

Photobucket


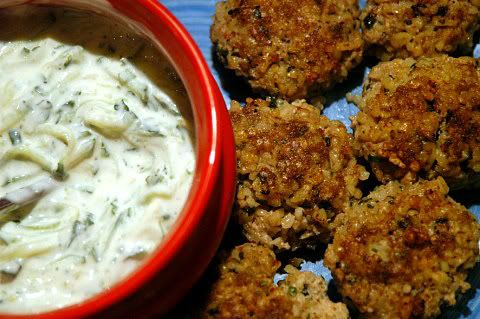
Lamb Patties with Yoghurt and Cucumber Dressing

Lamb Patties
1 teaspoon olive oil
100 g bulgur wheat
400 g ground lamb
2 garlic clove, crushed
2 tbsp mint, roughly chopped
3 tbsp coriander, roughly chopped
2 tsp harissa
1 tsp salt, to taste
1 tsp fresh ground black pepper, to taste

Yoghurt and Cucumber Dressing
1/3 cucumber, coarsely grated
1/2-1 tbsp mint, finely chopped
200 g plain yogurt
1-2 tsp salt
1 tsp fresh ground black pepper

For the lamb patties put the bulgur wheat in a bowl and cover with hot water. Set aside and allow to swell.

Mix the lamb mince and crushed garlic.

Season with salt and pepper to taste.

Add the chopped mint, coriander and the harrisa paste.

Squeeze the water from the wheat and add to the meat, mix well.

Form the mix into little patties, roughly the size of a flat golf ball.

Cover with clingfilm and chill for a minimum of 1 hour, make sure you cover it well otherwise your fridge will smell of garlic.

Heat oil in a non-stick frying pan and fry in batches until cooked through and golden, 5-10 minutes.

For the dressing put the grated cucumber in a colander and sprinkle with salt, leave for 30 minutes.

Squeeze the cucumber dry and mix with yoghurt and mint.

Season with black pepper to taste.

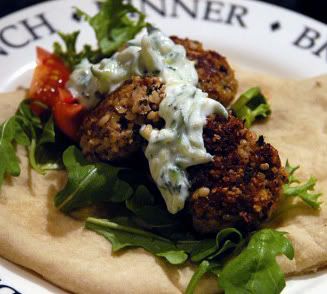
Serve the patties on some flatbread, topped with salad and the dressing. Roll up and enjoy.

Tuesday 8 April 2008

Quick as a Rocket Pasta

Pin It Now!

See what I've done there?! My excuse for this bad pun is, that today was my first day back at work after being off for two weeks. Therefore my brain is a little frazzled. Also, the plan was to go for a run tonight, but instead I'm on the sofa wanting tea and biscuits. There is just no way I'm gonna get my trainers and not-so-sexy lycra stuff out and face the hills. I just want to be lazy now and needed immediate comfort when I got in, so I cooked some pasta.

Photobucket

This is one of those dishes that's ideal for a weeknight, when you get in from work and just don't want to spend more then twenty minutes in the kitchen but still want a tasty homemade meal. Given the amount of garlic at least it's ideal if you don't have an important business meeting the next day. The dish is quite open for experimentation, for example try adding king prawns or use plenty of chopped basil instead of the rocket (arugula).


Photobucket

Pasta with Garlic, Tomatoes and Rocket (serves 2)

The amounts aren't exact, it doesn't matter if you use a little more or less of something.

olive oil
2 fat cloves of garlic, crushed
2-3 vine ripened tomatoes, chopped roughly
3 tbsp freshly grated parmesan
a large handful of rocket (arugula)
8 mini balls of buffalo mozzarella (optional)
salt, to taste
freshly ground black pepper, to taste
1 packet of fresh pasta (enough for two), cooked and drained

In a heavy based pan heat a generous amount of olive oil (about 3 tbsp).

Add the garlic and sautee over a very low heat for about 3-5 minutes, you don't want it to brown, just soften. Stir regularly.

Add the tomatoes and continue to cook for another five minutes.

Season to taste with salt and pepper.

Add the cooked pasta, parmesan and rocket and stir until all the pasta is coated and the rocket is starting to wilt. If you are using the mozzarella add it now as well.

Serve straight away, ideally with a large glass of red wine!


Monday 7 April 2008

Thou shall hev a fishy on a little dishy...

Pin It Now!

...thou shall hev a haddock when the boat comes in. That's how the song goes and haddock we had, but ours wasn't straight of the boat unfortunately.

I wanted to make Cheesy Crust Roasted Haddock last week, but by the time I would have got to the market I was sure that the fish monger would have had packed up, so I tried Tesco, but their fish counter was pretty bare, too. What to do? I thought I'd try frozen fish, it couldn't be too bad, could it? After all I have cooked with frozen salmon and frozen prawns before and the results had been quite good.

Well, I found a packet of frozen haddock fillets and proceeded to make the topping for the fish. When it came to putting it in the oven the packet read 40 minutes and I thought that had to be too long, after all the recipe for the fresh haddock, calls for just 10-12 minutes. So I put mine in the oven without the topping for about 20 minutes, then took it out and added the breadcrumb mix and returned it to the oven for another 10 minutes, giving it a total of 30 minutes. The flavours were good, so I'll be making it again, but the fish was really dry, therefore I'd urge you to try this recipe using fresh haddock and not frozen. Maybe it didn't help that I used Panko instead of fresh bread crumbs either.

It's simple and quick, and the topping has a fresh flavour and a nice crunch.

Photobucket

Cheesy Crust Roasted Haddock

1 1/2 tablespoons olive oil
4 haddock fillet
50 g fresh white breadcrumbs
50 g mature cheddar cheese, grated
1 tablespoon fresh parsley, chopped (I use basil)
50 g semi sun-dried tomato packed in oil, drained or you can use a tomato pesto or even fresh cherry tomatoes
salt and pepper, to taste

Preheat your oven to 220°C/425°F/Gas 7.

Coat a baking tray with 1/2 tsp olive oil and place the fish on top.

Mix the breadcrumbs, cheese and parsley, season to taste with salt and pepper and press, using the back of a spoon, onto the top of the fish fillets.

Place the tomatoes around the fish on the baking tray and drizzle everything with the rest of the oil. (I chopped up fresh cherry tomatoes and added them to the crumb mix)

Roast for approx 10-12 minutes until the crust becomes golden and the fish is cooked.

Times may vary depending on the thickness of your fish. If it needs longer you may need to cover the top with tin foil to stop it from burning, after the first 10 minutes.


Saturday 5 April 2008

Fajitas

Pin It Now!

I like Tex-Mex food. It's quick to make, has a bit of a kick to it and I usually have the ingredients in, even if I haven't planned for it. Of course the supermarkets sell all kind of dinner-kits as well, which aren't bad as prepared food goes I think, but usually I make my own seasoning mixes. They are easy, store well and work out much cheaper, plus of course I know exactly what goes into them.

The other night we had chicken fajitas after we'd been out all day. I still had to make the seasoning mix, but they were on the table within half an hour. I just quickly fried some chicken breast fillet (cut into strips), some sliced onion, sliced bell pepper and I also added some mushrooms as they needed using, sprinkled it liberally with the seasoning, added a little water and let it thicken. We simply had it rolled up in flour tortillas with some sour cream and grated cheese, but you could also add salsa, guacamole or picco de gallo.

Photobucket

Fajita Seasoning Mix

4 tbsp cornflour
4 tsp chili powder
4 tsp hot chili powder
3 tsp salt
4 tsp paprika
1 tsp sugar
3 tsp powdered chicken or vegetable stock
2 tsp garlic powder
2 tsp cayenne pepper
2 tsp cumin

Mix all the ingredients and store in an airtight container for up to 6 months.

Use as needed, 2 tbsp equals one of the store bought sachets.

Photobucket

A few more pictures

Pin It Now!

Okay, this is another post that's not got anything to do with food. I can't even pretend by mentioning Cream Tea, as we didn't have any this time, unless you're interested in a horribly dry Cinnamon Swirl I ate at Starbucks after our visit to Temple Newsam, but believe me you don't really want to know about it, it wasn't nice.

Anyways, I thought I'd share a few more photos from another of our day trips. After spending a day power shopping at Meadowhall in Sheffield on Wednesday, we thought it was time again for something a little more cultural yesterday, so we went to Temple Newsam in Leeds. I can't believe I had never been before, considering it's only about 15 miles from where I have been living for the last four years, but I guess that's how it goes. I lived in Oslo for a year and still never saw the Munch Museum.

Photobucket

Photobucket

Photobucket

Photobucket

For some reason I never got an exterior shot of the house.

Thursday 3 April 2008

Going Greek (or Lamb - One Perfect Ingredient)

Pin It Now!

I never used to cook much with lamb. Initially, I think that was due to the fact that I only really started cooking when I was still a student, but had gotten sick of just eating pasta and chips, and back then I found lamb just too expensive. Later on, I (for some reason that evades me now) always thought that lamb was difficult to cook, but I was so wrong. I love it in all kinds of different ways, slow cooked in curries or stews, minced in burgers or kofta and as a wonderful roast, seasoned with garlic, rosemary and lemon. It's just so versatile, full of flavour and really not difficult to get right at all.


Photobucket


My sister gave me Tessa Kiros' 'Falling Cloudberries' for my birthday last November and I promised her that during her stay with us she could choose a recipe from it and I'd cook it. After a lot of flicking through the pages, drooling over photographs and some deliberation she (we) decided to give the recipe for Youvetsi a try. It's a lamb and tomato dish with orzo, slow cooked in the oven to make the lamb fall-apart tender. Me, being me, adapted the recipe a little. I halved it, but used more than half the amount of tomatoes as otherwise I would have had a silly rest from the can I opened. I also adapted the cooking times, as the orzo would have never cooked in the times given, and added 1/2 tsp of oregano, but otherwise I pretty much stuck to it. Anyways, here is the recipe with the amounts given in the book (as most of you are probably cooking for more than two or three people), but my additions and cooking times, which worked just fine.

Photobucket


Youvetsi (serves 4-6)

3tbsp olive oil
800gr lamb shoulder or leg, trimmed and cubed
2 red onions, chopped finely
2 cloves of garlic, chopped
600gr tinned tomatoes with juice (I used 400gr in half the recipe)
1 piece of cinnamon
30gr butter
3/4tsp oregano, dried
1 liter water
400gr orzo
parmesan, pecorino or kefalotiri, grated

Preheat you oven to 180C/Gas 4.

Heat the olive oil in a heavy based casserole dish and fry the lamb in batches, until sealed and starting to brown. Season with salt and pepper.

Remove the meat from the casserole, add a little more oil if needed and fry the onions until soft. Add the garlic and fry for another minute.

Return the meat to the casserole, add the tomatoes, cinnamon and butter and bring to a boil. Crush the tomatoes with a spoon and simmer for five minutes.

Pour in the water, stir, cover and place in the oven for an hour.

After an hour rinse and drain the uncooked orzo, add it to the casserole, cover and return to the oven for another 30 minutes or until it has soaked up the liquid and is cooked, stirring once half way through.

If you feel the dish is getting too dry add a little more water.

Stir in grated cheese before serving. If you prefer you can replace the parmesan, pecorino or kefalotiri with feta or halloumi.


This post has been written and entered for the ONE PERFECT INGREDIENT competition hosted by Maninas: Food Matters. Go have a look if you haven't already seen it, you can win the latest Marcus Wareing cookbook, 'One Perfect Ingredient, Three Ways to Cook It'.