I have no idea what is going on at the moment. Everything seems so hectic and it doesn't even have anything to do with Christmas yet. I've not been doing much notable cooking over the last few weeks, that's why my posts have been so sporadic. I did buy a chicken to roast last weekend, with the intention to make it on Sunday, but we ended up going out so I made it during the week instead. This recipe is really easy though and doesn't require much effort at all, but still guarantees a well flavoured, moist chicken.
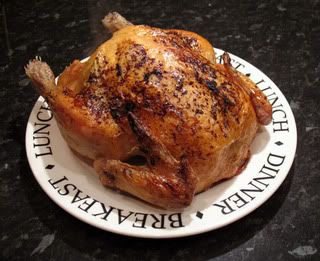
The original recipe calls for lime juice, but it also works well with lemon or orange. This is the perfect recipe for anybody who is roasting a chicken for the first time, but also good enough for company.
Honey & Lime Roast Chicken
1 chicken
1 onion, peeled and quartered
3 garlic cloves, peeled
1 lime, quartered
juice of 1/2 lime
1 tsp paprika
2tbsp honey
1 tbsp olive oil
salt, to taste
pepper, to taste
Preheat your oven to 200°C/400°F/Gas 6.
Rinse your chicken well, inside and out and dry thoroughly with a paper towel.
Rub salt and pepper into the cavity.
Stuff the cavity with the quartered lime, onion and the garlic.
Rub the olive oil all over the chicken and season with salt and pepper.
Place the chicken in a roasting tin and place in the middle of your preheated oven.
The roasting time depends on size of chicken. You need to calculate it as follows: Roast for 20 mins per lb plus an extra 20 minutes for the whole chicken (example: 4 lb chicken: 4x20+20=1hr40mins).
Using the juices from the roasting tin, baste the chicken every 30 mins to stop it from drying out.
While the chicken is roasting mix the lime juice, honey and parika in a small bowl.
30 mins before your chicken will be done take it out of the oven and brush with the lime& honey glaze.
Cover the roasting tin loosely with tin foil. The chicken should already have a lovely golden colour and covering it will stop the honey from burning. Return the chicken to the oven to finish roasting, at the end of the roasting time make sure all juices run clear by inserting a skewer into the thickest part of the thigh.