Sorry, I've been gone......
I have been here ocassionaly...

If you are anything like me, you will occasionally find some rather yucky sad looking bananas in your kitchen or your fruit bowl or wherever you keep your bananas. I mean the ones that aren't even really freckled any longer, but are turning a monochrome brown. I used to just throw bananas in the freezer before they got to that state, perfect for smoothies straight from frozen, no need for ice cubes. But since my current freezer compartment is teeny-tiny and space is at a total premium I now suffer a case of brown bananas more regularly. That's when I know it's time to make banana bread.

If you have ever googled banana bread recipes you will know that there is a nearly infinite number of recipes out there. So you might ask if the world really need another blog post about Banana Bread? Well, I think so and this one is my absolute favourite. I like the rum and cinnamon, as well as the walnuts, but feel free to experiment with the spices, types of booze or add chocolate chips instead of the nuts.

Boozy Banana Bread (1 loaf)
3 to 4 ripe bananas, mashed well with a fork
1/3 cup melted butter
3/4 cup muscovado sugar
1 egg, beaten
1 teaspoon vanilla
2 tablespoons spiced rum, or rum, or bourbon or whatever else takes your fancy
1 teaspoon baking powder
Pinch of salt
1 teaspoon cinnamon
1/2 teaspoon nutmeg
1 1/2 cup of flour
1/2 cup of walnuts
Preheat the oven to 180C/350F/Gas 4.
Grease a loaf tin.
Mix the butter and mashed banana in large mixing bowl. You won't need a mixer for any of this. A wooden spoon will do.
Add the sugar, egg, vanilla
and booze and mix in well.
Add the spices and stir again.
Sprinkle the baking soda and salt over the
mix and combine.
Finally add the flour and stir and once combined pour into your prepared loaf tin.
Place in the centre of the oven. Check after 50 minutes if done by inserting a wooden skewer in the middle. If it comes out clean, the cake is done if there is still some batter clinging to the skewer return to oven for another 10 minutes. Check again etc.
Allow to cool for 5 minutes in the tin, then carefully remove from the tin and cool on a wire rack.
Enjoy!
I won a competition a few weeks ago on Lavender & Lovage. The prize? £65 worth of fish from Delish Fish, a great family run business up in Scotland that delivers fresh fish directly to your door. I thought to myself at the time, that it was a little daft of me to enter, as I don't have a freezer and I live on my own. I figured I never win anything anyways though.
You can imagine my reaction when Karen got in touch to tell me I was the competition winner. I mean I was excited. It's always nice to be the winner of something, but I also started panicking slightly as to what to do with all that fish that was going to arrive on my doorstep shortly. Luckily, my friend Jacqueline who lives around the corner from me was kind enough to make some room in her freezer for all that fish, that I am now slowly and very happily cooking my way through. There'll be more recipes to follow, but let's start with Spanish Fish Stew, which I made with some of the lovely hake fillets I received.

My friends Lucy and Yuri had been driving back up to Manchester after a weekend in Brighton and I thought it'd be nice for them not to have to sort their own dinner out when they finally made it back after driving for six hours. Since they live in the same building as I, it was easy for them to drop their bags and just come upstairs to a hearty, smoky and warming fish stew (plus a very small beer).
I found the original recipe here and have adapted it to suit my taste and the contents of my larder.
Spanish Fish Stew (serves 4)
2 garlic cloves, finely chopped
1 lemon, zest and juice of
a generous handful of fresh coriander, roughly chopped
olive oil
1 onion, finely sliced
250g new potatoes, peeled and cut into 2cm chunks
1 heaped teaspoon paprika
a pinch of chilli powder or cayenne pepper
400g can chopped tomatoes
1 veg stock cube
1/2 - 1tbsp sugar
salt and freshly ground black pepper, to taste
200g raw king prawns
1 x 410g can chickpeas, rinsed and drained
500g skinless hake fish fillets
Mix the chopped coriander, lemon zest and half the garlic and set aside for later.
Heat then a large heavy bottomed pan, heat the oil and add the onions and potatoes. Cover and saute for about 5 minutes or so on medium heat, until the onions begin to soften. Stir from time to time.
Add the remaining garlic, paprika and chilli powder (or cayenne), stir to coat and cook for another couple of minutes, until fragrant.
Add the lemon juice, followed by the tomatoes and half a can of water. Crumble in the stock cube and add the sugar, it'll help cut some of the acidity of the tomatoes.
Cover and simmer for about 20 minutes until the potatoes are almost cooked.
Season with salt and pepper to taste.
Add the chickpeas and prawns and stir through.
Place the hake fillets on top of the stew, cover with a lid and simmer for another 10 minutes.
Remove from heat, scatter with the coriander/garlic/lemon zest mix and serve with some crusty bread to mop up the sauce.
Enjoy!
With the blog just having turned five, I thought it might be nice to look back and to write a post in which I share my favourite recipes of the last five years again.
It wasn't easy to narrow it down to just five, because there are plenty of others that I think are worth shouting about and that I make and eat all the time. I did my best however and here is Sylvie's Top Five in no particular order.....
Rockamole

The Rockamole is always a hit at a party. It is finger licking good and makes a great change from the usual Guacomole.
Aubergine and Green Bean Curry

This is a recipe from my favourite cookbook. River Cottage Veg Every Day by Hugh Fearnley-Whittingstall. It's fragrant and well spiced without being too much for those who like to go easy on the heat. I'd happily eat it every week.
Slow-cooked Venison Ragout

I don't eat much meat these days, but when I do I make sure it is good quality and hasn't been intensely farmed. Venison can be pricy, but when cooked properly it is worth every penny. This ragout was so good I wanted to lick my fingers and the plate.
Spicy Roast Aubergine with Chickpea Stew

This has become somewhat of a favourite for when I have friends round. I once heard one of them mutter the words 'better than sex' to describe the dish.
Easy Peasy Lemon Drizzle Cake
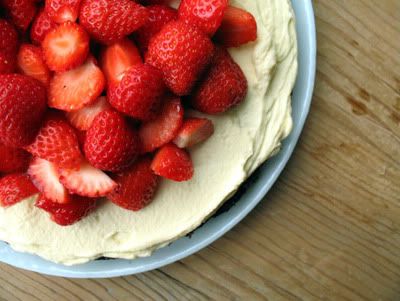
When I need cake and I need it quick, this is the one I make. I have been asked for the recipe so many times and you can make it into a much more elaborate cake for a special occasion by topping it with lemon cream and fresh berries (as the one in the picture above).
Interestingly enough when it comes to most popular posts in terms of
viewing numbers, only the Easy Peasy Lemon Drizzle Cake is in the top
five. In fact it is number four, number one with over 23000 views is Tana Ramsey's Lemon Drizzle Cake, which I don't think is anywhere near as good. Number two is Turkish Red Lentil Soup, number three Tomato, Mozzarella and Basil Appertizers and number five is Caramelised Onion and Feta Tart.
I've signed up to a weekly Organic Veg Box scheme recently. Of course with this being the end of October there are a lot of root vegetables about. I like roots, but I have to admit that I don't usually buy them all that often. I mean I try and eat seasonal food as much as possible, but in autumn I get excited by brassicas, such as savoy cabbage and Brussels sprout or by squashes, butternut being my favourite. Therefore having carrots delivered on a weekly basis, in addition to the occasional parsnip has meant trying out completely new recipes and it has been a bit of a challenge to not just let them sit in the fridge until limp.
I'm glad for the challenge though because it means that I discover brilliant new recipes, such as Any Veg Lentils with Cumin Yoghurt, or as I have called it Roast Roots with Lentils and Cumin Yoghurt, because I used up both the lingering carrots and parsnips. It would work equally well with red peppers, onions and roast beets I'm sure, or with roast cauliflower. Experiment and see what your favourite is. I was a little skeptical about the addition of lime zest and juice to the lentils, but it is really, really good!

The recipe is based on one that came from one of the Abel & Cole newsletters delivered with the box (this is not a sponsored post, they just deserve a mention). I served it with some grilled haloumi cheese and it made me and three friends happy eaters, so happy indeed that there wasn't a lentil left.
Roast Roots with Lentils and Cumin Yoghurt (serves 3-4)
olive oil
1 large onion, red or white, chopped finely
200g brown lentils, rinsed
400ml vegetable stock
6 carrots, peeled and halved lengthways
2 parsnips, peeled and quartered lengthways
salt and black pepper, to taste
1 small pot of natural yoghurt (150g)
1 heaped tsp of cumin seeds, toasted
a good pinch of chilli powder
1 lime, juice and zest of
a large handful of fresh coriander, chopped
Heat the oil in a large heavy bottomed pan (one that you have a lid for).
Add the onions, lower the heat and sautee for about five minutes or so, until beginning to soften, but not brown. Stir regularly.
Turn the heat up and add the lentils, cook for a minute or so.
Add the veg stock, bring to a boil and then reduce the heat.
Cover and simmer for about 30-40 minutes until the lentils have absorbed the stock. You should check regularly towards the end of the cooking time to avoid the lentils sticking and burning. Or like me you can add a little extra stock and drain it off once the lentils are tender.
As soon as the lentils go on you should toss your root veg in some oil, season with salt and pepper, spread out in one layer on a large baking tray and pop it in a preheated oven 220C/Gas 8.
Turn once after about 15-20 minutes and continue to roast for another 15-20 minutes until golden.
Whilst your lentils are simmering and your veg is roasting, mix the yoghurt in a small bowl with a splash of olive oil, cumin seeds and season with salt and pepper. Set aside.
Add the lime juice, zest and a pinch of chilli powder to the cooked lentils.
Season to taste with salt and pepper.
Toss in the roast roots and freshly chopped coriander.
Serve with the yoghurt dip.
Enjoy!
Well, the real reason for making an apple cake was that my lovely friend Liz came round on Sunday with a bag full of windfall apples from her garden that needed using. However, I also realised that A Pot of Tea and a Biscuit is five years old this week and figured I should bake a birthday cake to celebrate.

How time flies and how things change...
When I started blogging in 2007 there weren't all that many food blogs around. Sometimes it seems to me that you can't move around the internet for food blogs these days. On the one hand that's great, because it is wonderful to see how many people out there all over the world share my love for food and it also means that there is hardly a recipe or tip that I can't find online when needed. On the other hand at times it has made me question why I still bother, especially as so many of the blogs out there are absolutely amazing with magazine quality photographs and a regularity of posts that makes me wonder how the writers do it!?
There have been times over the last five years when I didn't feel like cooking or writing and the blog became like a neglected friend. You know the one? The one you know you should call, but for no apparent reason you keep putting off picking up the phone. And the longer you leave it the more guilty you feel. Well, in this case it's all you wonderful followers out there, those of you who leave nice comments or send me a friendly e-mail, asking questions about a recipe, wondering if I have a tip for a specific cooking related problem and also all you silent followers that register as a number in the blog stats, it's all of you that make me 'pick up the phone' in the end and get back to writing and cooking! So here is a BIG THANK YOU to all of you who keep reading even when I'm being neglectful.

I'd send you all a slice of this lovely apple cake, but I'm afraid technology has not yet advanced to that level, so you'll just have to try the recipe yourself. If you like apple cake, you'll love this one!
Norwegian Apple Cake (serves 8-12)
I've signed up for weekly Organic Veg Box delivery and as can be expected at this time of year there is an abundance of root vegetables, including carrots, big, small, orange, purple. Now, I don't mind carrots, but neither am I their biggest fan, so when I opened my fridge and found that I had accumulated 13 of them, I decided it was time for an action plan. First route of attack was to bake a carrot cake for the weekend and I'll also be making some kind of carrot slaw/salad this week, but more about that after I've made it.
The cake was so popular that I didn't have any left to take a decent picture once again, but I took that as a sign that it was definitely worth blogging about. The recipe is based on the one from The Great British Book of Baking, which accompanied last year's Great British Bake Off. If you live in the UK I'm sure you will have heard off the TV show, it was kind of hard not to. I'll be making it again soon, no doubt and will do my best to take a proper picture.

This is a delicious moist cake, with just the right amount nuts, good balance of spices and the addition of orange zest and juice makes it really nice and fresh as well. The original recipe is for a cake baked in two cake tins with has a layer of frosting in the middle as well as on top, but I baked mine in my 26cm spring form pan and just frosted the top of the cake. So here is the recipe as I made it.....

Carrot Cake (serves 8-12)
For the sponge:
225g self-raising flour
1tsp baking powder
1 1/2tsp ground cinnamon
1/4tsp grated nutmeg
1/2tsp ground mixed spice
1/2tsp ground ginger
22gg soft light muscovado sugar
grated zest of 1/2 unwaxed orange
100g walnut pieces
3 medium free-range eggs, beaten
150ml sunflower oil
250g grated carrots (about 3 medium ones)
For the frosting:
100g full-fat cream cheese
25g unsalte butter, softened
75g icing sugar, sifted
grated zest of 1/4 an unwaxed orange
1tsp orange juce
Preheat oven to 180C/350F/Gas 4.
Grease and line the bottom of a 26cm spring form pan.
In a large mixing bowl sift together the flour, baking powder and all the spices.
With a wooden spoon, mix in the sugar, the orange zest and the walnuts.
Now add in the beaten egg, sunflower oil and the grated carrot and keep stirring until all the ingredients are really well mixed.
Pour the batter into your prepared springform pan and spread out evenly with the back of a metal spoon.
Bake in the middle of your pr-heated oven for about 40 minutes. You might want to loosely cover the top with tin foil or baking parchment after about 30 minutes if it looks like it is getting to dark. You can check if the cake is done by inserting a wooden skewer into the middle. If it comes out clean the cake is done, if there is still batter clinging to the skewer put it in for another five minutes or so and then test again.
Set aside to cool for five minutes before running a knife carefully round the edge of the cake and carefully release the ring of your springform. Now set aside to cool completely.
Whilst the cake is cooling you can make the frosting, by beating all the frosting ingredients together in a mixing bowl with a wooden spoon. Beat quite rigorously until smooth and creamy. The frosting thickens up with beating, but if it's really warm weather or you have a warm kitchen, pop it in the fridge before spreading it on the cake.
Once the cake is completely cooled, spoon the frosting onto the top and evenly spread out to cover the whole top of the cake with the back of a wooden spoon or a palette knife.
If you like you can decorate the cake with more grated orange zest or some walnuts.
Enjoy!
P.S. If you prefer, you can bake the cake in 2 x 20.5cm round cake tins and 'sandwich' it with frosting as well as putting a second layer of frosting on top. In that case, just double the amount of frosting stated above and also reduce the baking time of the cakes to about 25 minutes.
I love peas. They are sweet, a bag of frozen ones is really affordable, they are versatile, healthy and they are beautifully green. Two of my favourite thing to make with peas are Kedgeree and Macaroni Peas. Also my mum's Split Pea Soup is one of my all time favourite things to eat and would make it onto the shortlist of dishes for my death row dinner.
The soup calls for the use of dried peas though and therefore takes quite a while to make, so when I want a quicker soup I make Garden Pea and Mint Soup. Peas and mint are just meant for one another and if you haven't tried the combination, don't wait any longer.

P.S. Lucy says: "Write how much I loved it!"
Garden Pea and Mint Soup (serves 4)
vegetable oil
a small knob of butter
a medium white onion or half a large leek, chopped finely
1 clove of garlic, minced
5 cups of frozen peas (you can use fresh of course)
a large handful of fresh mint, chopped finely
1 litre of good quality vegetable stock (or chicken if you're not vegetarian)
salt and pepper, to taste
a little grated parmesan (optional)
a little creme fraiche or sour cream (optional)
In a large heavy bottomed sauce pan, heat a little oil and a knob of butter over medium heat.
Add the onions or leek and saute till soft, stirring regularly to stop them from colouring. It should take about 5 minutes or so.
Add the garlic and saute for another couple of minutes.
Now add the peas, the chopped mint (keep a little back for garnish if you like) and the stock and bring to a boil.
Reduce heat to a simmer, cover and cook for about 10 minutes.
Remove from heat and carefully puree the soup using a stick blender. Watch out for hot soup splashes.
Season with salt and pepper to taste and return to the hob and heat through.
Serve hot with crusty bread for the perfect lunch.
If you like you can put a little grated parmesan in the bottom of the individual soup bowls before adding the hot soup, or alternatively try finishing each bowl off with a dollop of creme fraiche or sour cream.
Enjoy!
When I want comfort and a bit of spice I often make dhal. It's simple, it's tasty and best of all all the ingredients are part of my kitchen staples, so I usually don't have to worry about shopping for ingredients. There are plenty of different recipes if you google dhal and I have various different versions in my cook books as well.
This is quite a basic and quick recipe as uses red lentils, which cook quickly, so that I can have it on the table in just half an hour after coming in from work. This dhal is a bit soupy, so if you like your dhal thicker and a little drier just increase the amount of lentils or reduce the water (just watch that it doesn't stick and burn).
Serve it with our without rice and some chapatis for a comforting and
warming meal, perfect for these cold, dark and (at least in Manchester)
wet autumn nights.

Sorry about the poor picture. It's about time I dug my proper camera out again, especially now that it's getting to that time of year where I'm mainly having to rely on artificial light again.
Dhal (serves 3-4)
1 cup (250ml) red lentils, rinsed well
3cm fresh ginger, chopped finely
2 bay leaves
1 cinnamon stick
2 tbs butter
1 large onion, finely chopped
2 cloves garlic, crushed
2 tsp turmeric
1 tsp cumin
1/2 tsp garam marsala
1/2 red chilli, chopped finely (I left the seeds in, but that's up to you)
3 tomatoes, skinned and chopped
2 tbs lemon juice
1/2-1 tsp salt
a handfull of chopped fresh coriander
Put the rinsed lentils, chopped ginger, bay leaves and cinnamon stick in a large sauce pan and add 3 cups (750ml) of cold water.
Bring to the
boil and then reduce the heat to a simmer. Cook for 12-15 minutes until soft, stirring regularly to stop them from sticking.
I know I have been singing Hugh Fearnley-Whittingstall's praises a lot lately, but Yottam Ottolenghi is another chef who rarely disappoints and whose recipes often get me very excited, wanting to run to the shops for (the admittedly often long list of) ingredients right away. I still owe Yuri a pork belly dinner for giving me his duplicate copy of Ottolenghi - The Cookbook and now I want to buy Jerusalem by Ottolenghi and Sami Tamimi, too.
This recipe was published in last weekend's Guardian Weekend and as soon as I saw it I knew I had to try it. I love fish cakes anyways, but what really excited me about the Cod Cakes in Tomato Sauce was the lack of the usual mashed potatoes to bind and fill. These cod cakes are mainly just that, cod. Or in my case Haddock.

It takes a bit of time to prepare, but comes together easily and to be honest, most of what looks like a fairly substantial list of ingredients are staples and spices that I always have in my kitchen anyways. The fishacakes are delicate, moist and well seasoned. The tomato sauce is sweet with a very subtle hint of heat from the chili.
I served them with rice and the only thing I might criticize a little is that it would have been nice to have a bit more sauce. I guess I could have added a little extra water in the last step though. Here is my adapted version (no parsley in my kitchen, sorry). The original recipe can be found here.

Yottam Ottolenghi's Cod Cakes in Tomato Sauce (serves 4)
For the fishcakes:
3 slices good white bread, crusts removed
600g sustainably sourced cod (fillet, or halibut, hake or pollock), skinless and boneless
1 medium onion, peeled and finely chopped
4 garlic cloves, peeled and crushed
60g coriander, finely chopped
1 tbsp ground cumin
1½ tsp salt
2 large free-range eggs, beaten
4 tbsp olive oil
2 tbsp fresh mint leaves, roughly chopped
For the sauce:
2½ tbsp olive oil
1½ tsp ground cumin
½ tsp sweet paprika
1 tsp ground coriander
1 medium onion, chopped
125ml white wine
400g tin chopped tomatoes
1 red chilli, deseeded and finely chopped
1 garlic clove, crushed
2 tsp caster sugar
Salt and black pepper
Start with the tomato sauce:
Chose your largest frying pan with a lid and heat some olive oil.
Add the onion and spices and fry, stirring regularly for around 10 minutes, until soft.
Pour in the wine and continue to simmer for three minutes or so.
Stir in the tomatoes, chilli, garlic, sugar, half a teaspoon
of salt and some black pepper to the pan.
Continue to simmer over medium heat for around 15 minutes. The sauce should be quite thick at that point.
Check the seasoning, adjust if necessary and set the sauce aside.
Whilst the sauce is simmering away you can start on the fishcakes.
Blitz the bread in a food processor till you have breadcrumbs.
Chop the fish very finely and place it in the bowl, together with the breadcrumbs, onion, garlic, corriander, cumin, salt and beaten eggs.
Use your hands to mix well and then shape it into 8 fishcakes. They should be about 2cm thick and 8cm wide.
They will be quite wet and loose. Refridgerating them for half an hour will help firm them up if needed. Or if like me you are prepping ahead of time you can stick them covered in the fridge for a few hours.
Heat the olive oil in non-sticking frying pan and fry the cakes for three minutes on each side in two batches, adding oil as necessary. This is just to give them some colour and seal the outside a little, not to fully cook them.
If you follow this blog than you will know that my absolute favourite cookbook this year (or maybe even ever) is River Cottage Veg Everyday by Hugh Fearnley-Whittingstall and here is another from it. In the book it's called Macaroni Peas, but my friend H. quickly renamed it cheesy peas and it is her favourite comfort food at the moment.
It's delicious, it's so easy and quick to make and best of all, it's one of those recipes for which I always have all the ingredients in the house. As a result it has become part of my regular meal rotation and the go to recipe when I want something quick. I have made it so many times I don't measure the ingredients any more and to be honest there is no need to be all that exact anyways.
I have tried it with both Parmesan and goat's cheese and have to say that I prefer it made with Parmesan. I think the saltiness of it works better with the sweetness of the peas. But why don't you see for yourself?If you want to see the recipe as it is printed in the book, you'll find it here.
The reason I haven't blogged it about it before is that in all the times I have made it, I have never taken a proper picture of it. Ever. Just this mobile phone picture, but it'll just have to do.........

Macaroni Peas or Cheesy Peasy Pasta (serves 4)
500g peas or petit pois (fresh or frozen)
300g small macaroni or other small pasta shapes
50g butter
1 garlic clove, chopped
25g Parmesan or hard goat's cheese, coarsely grated, plus extra to serve
sea salt and freshly ground black pepper
shredded basil, to serve (optional
Bring a large pan of salt water to the boil for your pasta.
Simmer the peas for a few minutes until tender. If you are using older fresh peas this will take a little longer.
Whilst the peas are on, cook your pasta in the large pan of salt water until al dente.
Whilst the peas and pasta are cooking away, melt the butter in a pan over low heat and add the chopped garlic just for a minute or two. You don't want it to brown as that would make it bitter.
Take off the heat.
When the peas are cooked, drain them, but keep the cooking water.
Put about half the peas, the melted garlic butter and the grated cheese in a blender together with about 6tbsp of the pea cooking water and blitz until you have a smooth and loose puree. You can add more water if needed.
Add the remaining whole peas and season to taste with salt and pepper.
Drain the pasta and mix with the hot pea sauce straight away.
Serve topped with extra grated cheese and shredded basil if desired.
Enjoy!
I just realised to my horror that it has been over two months since I last posted, but I really did need a break from everything to recharge and ensure my continued sanity!
It's been a lovely summer, despite the more than miserable weather here in the UK. I was lucky enough to go the Olympics to witness Usain Bolt do his thing (Thanks again, R.!), I spend ten surprisingly sunny days traveling up the west coast of beautiful Scotland with my lovely sister (who would have thought that that's where summer had been hiding all along) and I followed that with more sun and fun in Catalonia with H.
Now, however, it's time to get back to normal life. Work starts back tomorrow, even though we have another two weeks before our old students return and the new ones arrive. I will also endeavor to get cooking and trying out new recipes in my little kitchen to share on here. I hope you're still with me and haven't completely given up on A Pot of Tea and a Biscuit yet!
For now here are some pictures from the last couple of months.....See you soon!


Unfortunately I have to say, that so far this summer has disappointed. Instead of BBQs and ice cream it's been all about waterproofs, woolly jumpers and even hot water bottles here in the UK. I hope you're faring better elsewhere in the world and the last couple of days have looked a little more promising here also, dare I say?!
At least some of my favourite seasonal late spring/early summer produce has been as good as always. One of the things I always look forward to, apart from riding my bike in the sunshine, having picnics in the garden or the park and getting all my dresses out of their winter storage place under the bed, is the arrival of asparagus season in May.
I know, I know I'm a little late as it's nearly July and the season is pretty much over, but I didn't want to wait a whole year to share this amazing recipe for Asparagus Pizza with Ham and Goat's Cheese by Hugh Fearnley-Whittingstall. It was published in the Guardian a few weeks ago and as I had friends round that day I tried it straight away.

I adjusted the recipe, especially the amounts of ingredients in the topping as I ran out after topping 1 1/2 of the pizzas, which wasn't a problem as I just topped the rest with tomato, ham, peppers and mature cheddar, but if you want to go for all the same this should work:
Asparagus Pizza with Ham and Goat's Cheese by Hugh Fearnley-Whittingstall
For the dough
250g plain white flour
250g strong white flour
1½ level tsp fine sea salt
1 tsp instant yeast
1 tbsp olive oil, plus a little extra
For the topping
4 tbsp olive oil, plus a little extra for trickling
4 large onions, peeled and sliced finely
salt and freshly ground black pepper
2 bunches slender green asparagus spears (about 800g)
200g air dried ham like parma or serrano
plenty of hard mature goat's cheese or parmesan (or a mix of both, or some soft goat's cheese)
To
make the pizza dough, in a large bowl mix the the flours with the salt and yeast.
Add the oil and 325ml warm water, using your hands mix everything until you have a rough dough.
Tip out the dough on to a clean and floured work surface.
Flour your hands and knead rhythmically for five to 10 minutes, until smooth.
Coat a large bowl with a fine layer of olive oil.
Put the dough into the bowl and cover loosely with a clean tea towel.
Place in in
a warm place to rise until doubled in size – at least one hour.
Pre-heat the oven to 240C/465F/gas mark 9, if it goes that high, or at least 220C/425F/gas mark 7, and put in a baking sheet or even better a pizza stone to warm up.
While the oven is getting hot, prepare the topping.
Heat the oil in a frying pan over medium heat.
Add
the sliced onions and a pinch of salt.
Reduce the heat to low and cook them gently.
Stir regularly to stop them from colouring. I also often cover them loosely with a bit of parchment paper which means they sweat as well as fry, which turns them nice and soft.
Fry for 20-30 minutes until really soft.
Returning to your dough, tip it out of the bowl on to a
lightly floured surface and deflate with your fingers.
Leave it to rest
for a few minutes, then divide it into three equal portions.
Roll out one piece as thinly as
you can.
Remove the hot baking sheet or pizza stone from from the oven, scatter over a little fine cornmeal or flour and lay the pizza base on it.
Spread a
third of the onions over the dough and arrange a third of the asparagus
on top. If your asparagus spears are thick, cut them in half lengthways.
Tear the ham into shreds and lay a third of it over the
asparagus.
Season with salt and freshly ground black pepper and finish with a generous trickle of good quality olive oil.
Bake the pizza for
10-12 minutes, until the base is crisp, the edges browned and the
asparagus tender.
Repeat with the remaining dough and topping.
Top with finely grated goat's cheese and/or parmesan as soon as it comes out of the oven and drizzle with a little more good quality olive oil. If you're using soft goat's cheese instead of the hard variety, put it on before the pizza goes in the oven.
Enjoy!
I have written about this cake before in this post and in this one, but it is so good I think it deserves another post.
It's funny, when I look at my blog stats the most popular post of all times is Tana Ramsey's Lemon Drizzle Cake, but this one is so much better and it is easier to make also. No creaming the butter and sugar, no heating lemon juice and sugar for a glaze and yet a perfect moist and lemony cake as a result. How can you go wrong?! Whenever I make this I get loads of compliments and requests for the recipe. So if you have come here after googling "lemon drizzle cake recipe" look no further! The recipe originally came from my friend Karen who writes Lavender and Lovage.
This one is for my students who are graduating this year. Well done to you all!

Easy Peasy Lemon Squeezie All-In-One Lemon Drizzle Cake
CAKE
5
oz
self-raising flour
1 tsp baking powder
4
oz
butter, softened
4 oz
golden caster sugar
2 tbsp good quality
lemon curd
1 large
lemon, rind of, grated
2
eggs, whisked
1 tbsp
water or
lemon juice
SYRUP
1
juice of
large lemon
4 oz granulated sugar
Preheat your oven to 175 C/Gas 3-4
Grease and line a 2 lb loaf tin or round cake tin.
Put
all the cake ingredients together into a large bowl & mix
thoroughly with a wooden spoon and then a hand held mixer for a maximum
of 3 minutes.
Pour into the prepared loaf or cake tin & bake for 45-50 minutes or until a skewer inserted comes out clean.
While the cake is baking, make the syrup, by mixing the lemon juice and sugar together.
On removing the cake from the oven, pierce all over the top with a fine skewer or fork - keeping the cake in the tin.
Whilst the cake is still hot, pour the syrup over the top of the cake. Leave it in the tin to cool.
The syrup will leave a crunchy residue of sugar and be sticky to touch.
The quantity above can be easily doubled for a larger family cake.
The cake can also be split and have lemon curd spread between the two layers - it is then called a Luscious Lemon Drizzle Cake.
a little longer. Sorry.
Work-wise this is the busiest time of the year for me. My final year students have just put up their work for this year Manchester School of Art Degree Show and I'm in the middle of assessing it. It's all very exciting, but means long and tiring days at the same time.
Will be back shortly....

I'm just about to jump in a taxi to get to the airport for a short work/research trip to Denmark, but I've got a recipe for Asparagus and Parma Ham Pizza for when I get back next week!
If you find yourself in Doverodde at the Book Arts Festival stop by and say hello!
I love dal. It's simple, it's comforting, it's filling, it's budget friendly.
The mistake I often make though is to over-complicate it, and whereas I really do like Makhani Dhal and Lentil, Cabbage and Tomato Dal (which I can't believe I haven't shared on here), I always really enjoy it when friends cook a really simple dal or on the rare occasion that I get an Indian take away.
When choosing things to cook for last week's curry night my mission was to try and keep the dal simple. So, I picked Chana Dal or Dal of Bengal Gram from Camille Panjabi's 50 Great Curries of India cookbook, a book which I've had for ages and which is full of really good recipes from various different regions.

The Dal is nice and creamy in texture. I photographed it cold the next morning,
so it appears somewhat drier and grainier in the image.
Chana Dal (serves 4)
250g Bengal gram (chana dal)
vegetable oil or ghee
salt
2 garlic cloves chopped
1 cm piece of fresh ginger, chopped finely
2 green chillies, chopped finely
1 bay leaf
1/2tsp cumin seeds
3/4tsp red chilli powder
1/2tsp tumeric
1 tomato, chopped
1/2 tsp sugar
a pinch of asafoetida
fresh coriander leaves, chopped
Wash the dal well and put it in a pan covered with water to soak for 15-20 minutes.
Drain and top with 500ml of fresh water. Bring to a boil, reduce heat and simmer for 20 minutes or so until soft.
Add about a teaspoon of salt and remove from heat.
Heat some oil in a small frying pan and saute the garlic, ginger, chillies and bay leaf for two minutes.
Add the cumin, red chilli and tumeric and stir well, then add the chopped tomato and continue to stir for two more minutes.
Add this spice mixture, the sugar and the asafoetida to the dal and bring back to a boil. Reduce the heat and continue to simmer until the dal is very soft, but still semi-separate.
Top with fresh coriander leaves before serving with rice or roti.
If you follow this blog then you will have noticed that I have been trying quite a few recipes from Hugh Fearnley-Whittingstall's River Cottage Veg Everyday cookbook. The Aubergine and Green Bean Curry is the latest one I have tried and once again it confirms to me what a great cookbook this is.
I had seven friends round for dinner on Monday and rather than just making one huge curry I made three different ones, a Chana Dhal, Muttar Paneer and the Aubergine and Green Bean one. I think they all went down equally well and different people had different favourites.

Now the original recipe can be found here, but below is my adaptation. I stuck with the ingredients and measurement, but only made one portion of curry paste (rather than making double and freezing half). The more important change I made though was the aubergine prep. The thought of frying five large aubergines in batches, as suggested in the original recipe, filled me with dread. I knew I'd be bored before I even got into the real cooking, so after chopping them I simply put them in the oven and roasted them instead. Easy-peasy, little effort and I'm sure just as good.
Hugh Fearnley-Whittingstall's Aubergine and Green Bean Curry (serves 6-8)
5 large aubergines (eggplants)
olive oil for drizzling
400ml coconut milk
300ml good quality tomato passata
300g green beans, topped and tailed
For the curry paste:
3 garlic cloves, roughly chopped
3 shallots, roughly chopped
1 thumb-sized piece of ginger, roughly chopped
2 hearts of lemongrass, chopped
2-3 green chillies, deseeded and roughly chopped
1 tsp ground coriander
1 tsp ground cumin
1/2 tsp turmeric
For the raita:
3 tsp mango chutney
8 tbsp plain yogurt
fresh coriander (cilantro), to garnish
Optional: Some crushed toasted cashew nuts or almonds to serve.
Preheat your oven to 190C/Gas 5/375F.
Cut the aubergines in half lengthways and divide each half into four again. Then cut all the long strips in half, so that you get 16 wedges from each aubergine.
Spread them out into a single layer on a large baking tray (I had two trays full), drizzle generously with olive oil, sprinkle with sea salt and roast for 30 minute, until starting to brown.
Whilst the aubergines are roasting, put the garlic, shallots, ginger, lemon grass, chillies, ground coriander, ground cumin and turmeric in a food processor. Add a tablespoon or so of water and blitz until you have a smooth paste.
Heat a little vegetable oil in a large saucepan and fry the curry paste for a couple of minutes, stirring continuously.
Add the roast aubergines and stir until they are well covered with the paste.
Add the
coconut milk and tomato passata, stir until well combined and bring to a simmer.
Add the green
beans and continue to simmer for 15 minutes or so. You want the beans to be tender but still have a little bit. The aubergines will break apart a bit, but it just adds to the richness and texture of the sauce.
Serve with rice and/or chapatis.
If you like top with some toasted cashew nuts or almonds. It adds a lovely bit of sweetness and crunch.
Combine the mango chutney and yoghurt in a small serving bowl. Sprinkle with some chopped coriander and serve alongside the curry.
Enjoy!

Getting ready for tomorrow's girls' world curry night, after which I should finally have some new recipes to share. There'll be Muttar Paneer, Chana Dhal and Aubergine and Green Bean Curry.
It looks like my break turned out to be a little longer than I had anticipated. As soon as I got back from Germany I was too busy making books for the Artists' BookMarket at the Fruitmarket Gallery in Edinburgh to spend much time in the kitchen and just as I thought that life was back to normal, I put my back out and couldn't do much more than hobble about for a few days. I'm okay now though and cooking will resume in my spatially-challenged kitchen.

My friend Yuri gave me a copy of Ottolenghi The Cookbook a while ago, as he already owned a copy and was given a second one for Christmas. Lucky me. (Yuri, I haven't forgotten that I owe you a Roast Pork Belly dinner.)
I was really excited about the book when I found that it contained the recipe for Cucumber and Poppy Seed Salad, which I had had at a cafe in the Lake District last summer and had been trying to find online without really knowing what to look for. I just searched for cucumber salad and surprise, surprise couldn't find the right recipe. Anyways, I digress. I'll be blogging about the salad some time soon. In the meantime let me share the recipe for Cauliflower and Cumin Fritters with Lime Yogurt which I made the other night. 
They were really good and quite quick to do. I adapted the original Ottolenghi recipe as I don't like parsley and don't like frying in loads of oil. Next time I'll also definitely add some chillies, as the fritters are sweet from the cauliflower and tart from the lime and the yoghurt, but they really need some heat in my opinion. So here's my adapted recipe, in which I have already included chillies, as I'm sure they'll make them perfect.
Cauliflower and Cumin Fritters with Lime Yogurt (serves 4)
For the fritters:
1 small cauliflower (about 320g), trimmed and cut into small florets
120 g plain flour
3 tbsp chopped fresh coriander (cilantro), plus a few extra leaves to garnish
1 garlic clove, crushed
2 shallots, finely chopped
1-2 medium chillies, seeds removed and chopped finely
4 free-range eggs
1 1/2 teaspoons ground cumin
1 teaspoon ground cinnamon
1/2 teaspoon ground turmeric
1 1/2 teaspoon salt
1 teaspoon black pepper
oil for frying
For the Yogurt Sauce:
300g Greek yogurt
2tbsp finely chopped fresh coriander (cilantro)
grated zest of one lime
2tbsp of lime juice
2tbsp of olive oil
salt and pepper
For the yoghurt sauce combine the yoghurt, coriander, lime juice and zest and olive oil in a bowl and stir until well mixed. Season to taste with salt and pepper.
For the fritters put the cauliflower in a pan of boiling salted water and cook for about 15 minutes. You want it to go really soft so that it will fall apart when you add it to the batter later.
In a bowl whisk together the flour, coriander, garlic, shallots, chillies, eggs, cumin, cinnamon and tumeric until you have a well combined and smooth thick batter.
Once the cauliflower is cooked, drain it and add it to the batter. Stir with a fork until the florets have broken up into small pieces and everything is well combined.
Heat some olive oil in a large frying pan. Once hot spoon in the batter with a large serving spoon (about three tbsp per fritter).
My pan will hold about four fritters at a time.
Keep checking the temperature of the oil. You don't want it to get too hot, so that the fritters will burn.
Fry for around 3-4 minutes on each side, until golden.
Remove from the pan, allow to drain on some kitchen paper and serve with the yoghurt sauce and some salad or stuff them into a pita pocket.
Enjoy!
I seem to have loads and loads of pictures of food stored on my Mac. Going through them is a bit like reading a diary. They remind me of good times shared with friends, family and loved ones. Here are twelve pictures from the last year in no particular order....

Festival Frolics

Great Langdale Bacon Buttie

Brooklyn Diner Pot Pie

Atlantic Supper (half portion)

70s Birthday Buffet

Sisterly Luncheon

Pancake Lovin'

Detox

Parisian €5 Fancy (worth every cent)

Shared Grand Central Red Velvet (cake and accessories matched)

Christmas Cheer (too pretty to eat)

Sexy Banoffee Pie